Một số lần trong ứng dụng của bạn, nếu bạn muốn yêu cầu người dùng đưa ra quyết định lựa chọn giữa Yes hoặc No đáp ứng của bất kỳ hành động cụ thể thực hiện bởi người sử dụng, bởi còn lại trong các hoạt động tương tự và không có thay đổi màn hình, bạn có thể sử dụng Alert Dialog.
Để sử dụng Alert Dialog bạn cần khai báo đối tượng AlertDialogBuilder. Cú pháp như sau:
AlertDialog.Builder alertDialogBuilder = new AlertDialog.Builder(this);
Bây giờ bạn phải thiết lập các nút Yes hoặc No bằng cách sử dụng đối tượng của lớp AlertDialogBuilder. Cú pháp như sau:
alertDialogBuilder.setPositiveButton(CharSequence text, DialogInterface.OnClickListener listener) alertDialogBuilder.setNegativeButton(CharSequence text, DialogInterface.OnClickListener listener)
Ngoài ra, bạn có thể sử dụng các chức năng khác được cung cấp bởi các lớp xây dựng để tùy chỉnh các hộp thoại cảnh báo. Dươi đây là những thuộc tính hay sử dụng:
Phương thức - mô tả
1- setIcon(Drawable icon)
Phương thức này để đặt icon cho hộp thoại.
2- setCancelable(boolean cancelable)
Phương thức này thiết lập thuoocjt ính cho hộp thoại có thể hủy bỏ học không
3- setMessage(CharSequence message)
Phương thức này thiết lập thông báo hiển thị trên hộp thoại.
4- setMultiChoiceItems(CharSequence[] items, boolean[] checkedItems, DialogInterface.OnMultiChoiceClickListener listener)
Phương thức này thiết lập danh sách các phần tử để hiển thị trong hộp thoại
5- setOnCancelListener(DialogInterface.OnCancelListener onCancelListener)
Phương thức này thiết lập gọi trở lại nếu cancel
6- setTitle(CharSequence title)
Phương thức này thiết lập tiêu đề của hộp thoại
Cú pháp để tạo ra và hiển thị một hộp thoại
*Code: src/com.example.alertdialog/NegativeActivity.java
package com.example.alertdialog;
*Code: res/layout/activity_negative.xml
*Code: Strings.xml
*Code: AndroidManifest.xml
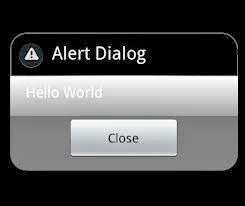
Kết quả:


AlertDialog.Builder alertDialogBuilder = new AlertDialog.Builder(this);
Bây giờ bạn phải thiết lập các nút Yes hoặc No bằng cách sử dụng đối tượng của lớp AlertDialogBuilder. Cú pháp như sau:
alertDialogBuilder.setPositiveButton(CharSequence text, DialogInterface.OnClickListener listener) alertDialogBuilder.setNegativeButton(CharSequence text, DialogInterface.OnClickListener listener)
Ngoài ra, bạn có thể sử dụng các chức năng khác được cung cấp bởi các lớp xây dựng để tùy chỉnh các hộp thoại cảnh báo. Dươi đây là những thuộc tính hay sử dụng:
Phương thức - mô tả
1- setIcon(Drawable icon)
Phương thức này để đặt icon cho hộp thoại.
2- setCancelable(boolean cancelable)
Phương thức này thiết lập thuoocjt ính cho hộp thoại có thể hủy bỏ học không
3- setMessage(CharSequence message)
Phương thức này thiết lập thông báo hiển thị trên hộp thoại.
4- setMultiChoiceItems(CharSequence[] items, boolean[] checkedItems, DialogInterface.OnMultiChoiceClickListener listener)
Phương thức này thiết lập danh sách các phần tử để hiển thị trong hộp thoại
5- setOnCancelListener(DialogInterface.OnCancelListener onCancelListener)
Phương thức này thiết lập gọi trở lại nếu cancel
6- setTitle(CharSequence title)
Phương thức này thiết lập tiêu đề của hộp thoại
Cú pháp để tạo ra và hiển thị một hộp thoại
AlertDialog alertDialog = alertDialogBuilder.create();
alertDialog.show();
Ví dụ:
Ví dụ sau đây cho thấy việc sử dụng các AlertDialog trong Android. Sử dụng 3 active khác nhau.
1. Tạo Project như hình vẽ:

2. Viết code cho các file
Ví dụ:
Ví dụ sau đây cho thấy việc sử dụng các AlertDialog trong Android. Sử dụng 3 active khác nhau.
1. Tạo Project như hình vẽ:

2. Viết code cho các file
*Code: src/com.example.alertdialog/MainActivity.java
package com.example.alertdialog;
package com.example.alertdialog;
import com.example.alertdialog.*;
import android.os.Bundle;
import android.app.Activity;
import android.app.AlertDialog;
import android.content.DialogInterface;
import android.content.Intent;
import android.view.Menu;
import android.view.View;
public class MainActivity extends Activity
{
@Override
protected void onCreate(Bundle savedInstanceState)
{
super.onCreate(savedInstanceState);
setContentView(R.layout.activity_main);
}
public void open(View view)
{
AlertDialog.Builder alertDialogBuilder = new AlertDialog.Builder(this);
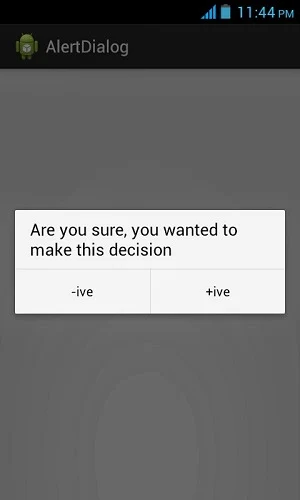
alertDialogBuilder.setMessage(R.string.decision);
alertDialogBuilder.setPositiveButton(R.string.positive_button,
new DialogInterface.OnClickListener()
{
@Override
public void onClick(DialogInterface arg0, int arg1)
{
Intent positveActivity = new Intent(getApplicationContext(),com.example.alertdialog.PositiveActivity.class);
startActivity(positveActivity);
}
});
alertDialogBuilder.setNegativeButton(R.string.negative_button,
new DialogInterface.OnClickListener()
{
@Override
public void onClick(DialogInterface dialog, int which)
{
Intent negativeActivity = new Intent(getApplicationContext(),com.example.alertdialog.NegativeActivity.class);
startActivity(negativeActivity);
}
});
AlertDialog alertDialog = alertDialogBuilder.create();
alertDialog.show();
}
@Override
public boolean onCreateOptionsMenu(Menu menu)
{
// Inflate the menu; this adds items to the action bar if it is present.
getMenuInflater().inflate(R.menu.main, menu);
return true;
}
}
*Code: src/com.example.alertdialog/PositiveActivity.java
package com.example.alertdialog;
package com.example.alertdialog;
import android.os.Bundle;
import android.app.Activity;
import android.view.Menu;
public class PositiveActivity extends Activity
{
@Override
protected void onCreate(Bundle savedInstanceState)
{
super.onCreate(savedInstanceState);
setContentView(R.layout.activity_positive);
}
@Override
public boolean onCreateOptionsMenu(Menu menu)
{
// Inflate the menu; this adds items to the action bar if it is present. //getMenuInflater().inflate(R.menu.positive, menu);
getMenuInflater().inflate(R.menu.main, menu);
return true;
}
}
*Code: src/com.example.alertdialog/NegativeActivity.java
package com.example.alertdialog;
import android.os.Bundle;
import android.app.Activity;
import android.view.Menu;
public class NegativeActivity extends Activity
{
@Override
protected void onCreate(Bundle savedInstanceState)
{
super.onCreate(savedInstanceState);
setContentView(R.layout.activity_negative);
}
@Override
public boolean onCreateOptionsMenu(Menu menu)
{
// Inflate the menu; this adds items to the action bar if it is present.
//getMenuInflater().inflate(R.menu.negative, menu);
getMenuInflater().inflate(R.menu.main, menu);
return true;
}
}
*Code: res/layout/activity_main.xml
*Code: res/layout/activity_main.xml
<RelativeLayout xmlns:android="http://schemas.android.com/apk/res/android"
xmlns:tools="http://schemas.android.com/tools"
android:layout_width="match_parent"
android:layout_height="match_parent"
android:paddingBottom="@dimen/activity_vertical_margin"
android:paddingLeft="@dimen/activity_horizontal_margin"
android:paddingRight="@dimen/activity_horizontal_margin"
android:paddingTop="@dimen/activity_vertical_margin"
tools:context=".MainActivity" >
<Button
android:id="@+id/button1"
android:layout_width="wrap_content"
android:layout_height="wrap_content"
android:layout_alignParentTop="true"
android:layout_centerHorizontal="true"
android:layout_marginTop="170dp"
android:onClick="open"
android:text="@string/hello_world" />
</RelativeLayout>
*Code: res/layout/activity_negative.xml
<RelativeLayout xmlns:android="http://schemas.android.com/apk/res/android"
xmlns:tools="http://schemas.android.com/tools"
android:layout_width="match_parent"
android:layout_height="match_parent"
android:paddingBottom="@dimen/activity_vertical_margin"
android:paddingLeft="@dimen/activity_horizontal_margin"
android:paddingRight="@dimen/activity_horizontal_margin"
android:paddingTop="@dimen/activity_vertical_margin"
tools:context=".NegativeActivity" >
<TextView
android:id="@+id/textView1"
android:layout_width="wrap_content"
android:layout_height="wrap_content"
android:layout_alignParentLeft="true"
android:layout_alignParentTop="true"
android:layout_marginLeft="14dp"
android:layout_marginTop="17dp"
android:text="@string/negative"
android:textAppearance="?android:attr/textAppearanceLarge" />
</RelativeLayout>
*Code: res/layout/activity_positive.xml
<RelativeLayout xmlns:android="http://schemas.android.com/apk/res/android"
xmlns:tools="http://schemas.android.com/tools"
android:layout_width="match_parent"
android:layout_height="match_parent"
android:paddingBottom="@dimen/activity_vertical_margin"
android:paddingLeft="@dimen/activity_horizontal_margin"
android:paddingRight="@dimen/activity_horizontal_margin"
android:paddingTop="@dimen/activity_vertical_margin"
tools:context=".PositiveActivity" >
<TextView
android:id="@+id/textView1"
android:layout_width="wrap_content"
android:layout_height="wrap_content"
android:layout_alignParentLeft="true"
android:layout_alignParentTop="true"
android:layout_marginLeft="14dp"
android:layout_marginTop="20dp"
android:text="@string/positive"
android:textAppearance="?android:attr/textAppearanceLarge" />
</RelativeLayout>
<?xml version="1.0" encoding="utf-8"?>
<resources>
<string name="app_name">AlertDialog</string>
<string name="action_settings">Settings</string>
<string name="hello_world">Hello world!</string>
<string name="title_activity_positive">PositiveActivity</string>
<string name="title_activity_negative">NegativeActivity</string>
<string name="positive">Positive Activity</string>
<string name="negative">Negative Activity</string>
<string name="decision">Are you sure, you wanted to make this decision</string>
<string name="positive_button">+ive</string>
<string name="negative_button">-ive</string>
</resources>
*Code: AndroidManifest.xml
<?xml version="1.0" encoding="utf-8"?>
<manifest xmlns:android="http://schemas.android.com/apk/res/android"
package="com.example.alertdialog"
android:versionCode="1"
android:versionName="1.0" >
<uses-sdk
android:minSdkVersion="8"
android:targetSdkVersion="17" />
<application
android:allowBackup="true"
android:icon="@drawable/ic_launcher"
android:label="@string/app_name"
android:theme="@style/AppTheme" >
<activity
android:name="com.example.alertdialog.MainActivity"
android:label="@string/app_name" >
<intent-filter>
<action android:name="android.intent.action.MAIN" />
<category android:name="android.intent.category.LAUNCHER" />
</intent-filter>
</activity>
<activity
android:name="com.example.alertdialog.PositiveActivity"
android:label="@string/title_activity_positive" >
</activity>
<activity
android:name="com.example.alertdialog.NegativeActivity"
android:label="@string/title_activity_negative" >
</activity>
</application>
</manifest>
Kết quả:


*******
Một số tài liệu và khoá học bổ ích dành cho bạn:
# Giáo trình: Lập Trình Android [Click để xem]
# Khoá học online: Lập trình Android toàn tập [Click để xem]
Tham khảo tutorialspoint.com