Trong bài tập này Tôi sẽ trình bày về cách lưu trạng thái của ứng dụng (liên quan tới Shared Preferences) và cách tạo các màn hình cấu hình (liên quan tới Shared Preference Change Listeners)
———————————————————
*******
Một số tài liệu và khoá học bổ ích dành cho bạn:
# Giáo trình: Lập Trình Android [Click để xem]
# Khoá học online: Lập trình Android toàn tập [Click để xem]
-A- Cách lưu trạng thái của ứng dụng:
Bước 1:
– Gọi hàm getSharedPreferences, hàm này trả về SharedPreferences và nó có 2 đối. Đối số 1 là tên tập tin để lưu trạng thái, đối số 2 là kiểu lưu. Chú ý là đối số 1 ta chỉ ghi tên tập tin (không cần ghi phần mở rộng, vì phần mở rộng mặc nhiên của nó là .xml khi ta lưu thành công), đối số 2 thường ta để là MODE_PRIVATE:
SharedPreferences pre=getSharedPreferences(“my_data“, MODE_PRIVATE);
Bước 2:
– Tạo đổi tượng Editor để cho phép chỉnh sửa dữ liệu:
SharedPreferences.Editor edit=pre.edit();
Bước 3:
– Đưa dữ liệu muốn lưu trữ vào edit bằng các phương thức edit.putXXX(“key”,”value”);
Tùy vào kiểu dữ liệu ta muốn lưu trữ mà XXX được thay thế bởi các kiểu dữ liệu phù hợp:
editor.putString(“user”, “drthanh”);
editor.putString(“pwd”, “hoilamgi”);
editor.putBoolean(“checked”, true);
Bước 4:
– Lưu trạng thái bằng cách gọi dòng lệnh:
editor.commit();
————————————————————————————————————————–
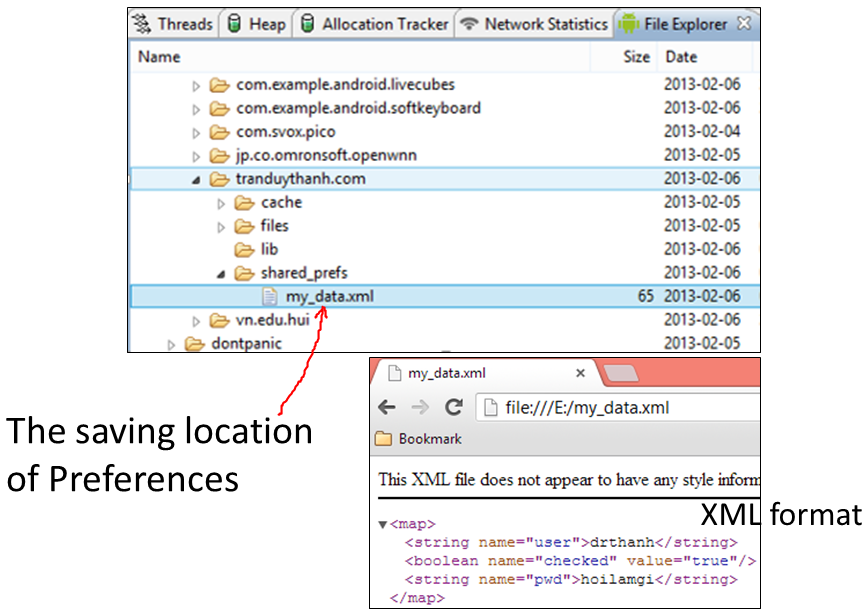
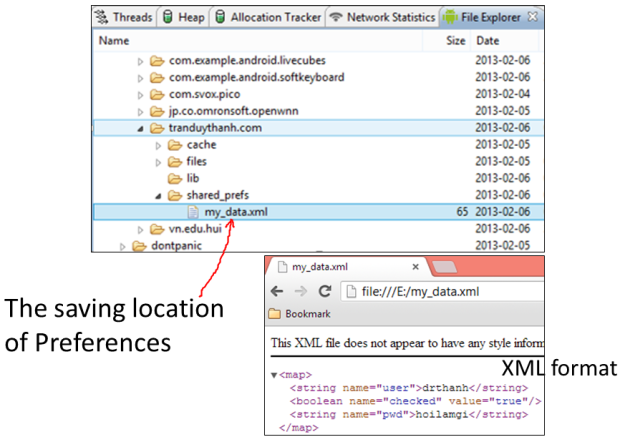
Sau khi bạn làm đúng 4 bước trên thì chương trình sẽ lưu được trạng thái, như trên đã nói mặc định phần mở rộng là .xml (tức là trạng thái được lưu dưới định dạng tập tin XML). Bên trên ta đặt tên là my_data có nghĩa là chương trình sẽ tạo ra tập tin my_data.xml (bạn mở DDMS lên để xem) – tự động nó sẽ lưu vào thư mục shared_prefs như hình bên dưới:
————————————————————————————————————————–
-B- Cách đọc trạng thái đã lưu:
Rất đơn giản
Bước 1:
– Gọi hàm getSharedPreferences để trả về đối tượng SharedPreferences (giống như phần lưu trạng thái mà Tôi nói ở trên)
SharedPreferences pre=getSharedPreferences (“my_data“,MODE_PRIVATE);
Bước 2:
– Gọi các phương thức getXXX(“key”,giá trị mặc định) để lấy các giá trị lúc trước được lưu
boolean bchk=pre.getBoolean(“checked”, false); //đối số 2 Tôi để false là giá trị mặc định khi nó tìm không thấy key =checked
String user=pre.getString(“user”, “”);//lấy giá trị được lưu trong key=user, nếu không thấy thì gán giá trị mặc định là chuỗi rỗng
String pwd=pre.getString(“pwd”, “”);//giống trên
————————————————————————————————————————–
******** Gợi ý *******
– Lưu và đọc trạng thái bạn nên viết thành các hàm riêng biệt cho dễ sử dụng
– Hàm lưu bạn gọi trong sự kiện onPause
– Hàm đọc bạn gọi trong sự kiện onResume.
******** END *******
Tôi sẽ làm ví dụ cụ thể dưới đây để bạn hiểu rõ hơn về lý thuyết:
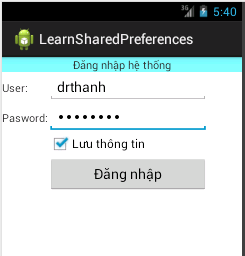
Ví dụ 1: bạn muốn tạo một màn hình đăng nhập có checkbox cho phép lưu lại thông tin đăng nhập, lần sau khởi đội lại thì nó sẽ lấy lại thông tin nhập lúc trước để người sử dụng đỡ phải mất công nhập lại (biết về Shared Preferences), xem hình mình họa:

– Khi chọn nút đăng nhập, chương trình sẽ đóng Activity hiện tại và hiển thị Activity dưới đây:
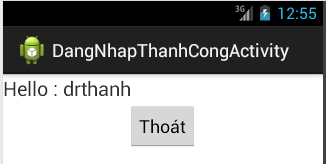
– Chọn nút Thoát, chương trình tiếp tục đóng Activity này giúp tắt hẳn các Activity trong ứng dụng.
– Khởi động lại chương trình sẽ phải tự động load lại thông tin đăng nhập trước đó (Nếu khi đăng nhập có chọn “Lưu thông tin“).
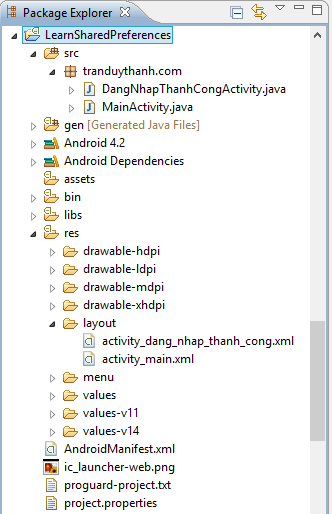
– Bạn xem cấu trúc của Project:
– Layout XML của màn hình chính (activity_main.xml):
1 2 3 4 5 6 7 8 9 10 11 12 13 14 15 16 17 18 19 20 21 22 23 24 25 26 27 28 29 30 31 32 33 34 35 36 37 38 39 40 41 42 43 44 45 46 47 48 49 50 51 52 53 54 55 56 57 58 59 60 61 62 63 64 65 66 67 68 69 70 71 72 73 74 75 76 77 78 79 80 81 82 83 84 85 86 87 88 89 90 91 92 93 94 95 96 97 | android:id="@+id/LinearLayout1"
android:layout_width="match_parent"
android:layout_height="match_parent"
android:orientation="vertical"
tools:context=".MainActivity" >
<TextView
android:id="@+id/textView1"
android:layout_width="match_parent"
android:layout_height="wrap_content"
android:background="#80FFFF"
android:gravity="center"
android:text="Đăng nhập hệ thống" />
<TableLayout
android:layout_width="match_parent"
android:layout_height="wrap_content"
android:stretchColumns="*"
>
<TableRow
android:id="@+id/tableRow1"
android:layout_width="wrap_content"
android:layout_height="wrap_content" >
<TextView
android:id="@+id/textView2"
android:layout_width="wrap_content"
android:layout_height="wrap_content"
android:text="User:" />
<EditText
android:id="@+id/editUser"
android:layout_width="wrap_content"
android:layout_height="wrap_content"
android:inputType="text"
android:ems="10" >
<requestFocus />
</EditText>
</TableRow>
<TableRow
android:id="@+id/tableRow2"
android:layout_width="wrap_content"
android:layout_height="wrap_content" >
</TableRow>
<TableRow
android:id="@+id/tableRow3"
android:layout_width="wrap_content"
android:layout_height="wrap_content" >
<TextView
android:id="@+id/textView3"
android:layout_width="wrap_content"
android:layout_height="wrap_content"
android:text="Pasword:" />
<EditText
android:id="@+id/editPassword"
android:layout_width="wrap_content"
android:layout_height="wrap_content"
android:ems="10"
android:inputType="textPassword" />
</TableRow>
<TableRow
android:id="@+id/tableRow4"
android:layout_width="wrap_content"
android:layout_height="wrap_content" >
<CheckBox
android:id="@+id/chksaveacount"
android:layout_width="wrap_content"
android:layout_height="wrap_content"
android:layout_column="1"
android:text="Lưu thông tin" />
</TableRow>
<TableRow
android:id="@+id/tableRow5"
android:layout_width="wrap_content"
android:layout_height="wrap_content" >
<Button
android:id="@+id/btnlogin"
android:layout_width="wrap_content"
android:layout_height="wrap_content"
android:layout_column="1"
android:text="Đăng nhập" />
</TableRow>
</TableLayout>
</LinearLayout>
|
– Layout XML của activity_dang_nhap_thanh_cong.xml:
1 2 3 4 5 6 7 8 9 10 11 12 13 14 15 16 17 18 19 20 21 22 23 | android:id="@+id/LinearLayout1"
android:layout_width="match_parent"
android:layout_height="match_parent"
android:orientation="vertical"
tools:context=".DangNhapThanhCongActivity" >
<TextView
android:id="@+id/txtmsg"
android:layout_width="match_parent"
android:layout_height="wrap_content"
android:text="TextView"
android:textSize="20sp" />
<Button
android:id="@+id/btnThoat"
android:layout_width="wrap_content"
android:layout_height="wrap_content"
android:layout_gravity="center"
android:text="Thoát" />
</LinearLayout>
|
– Bạn xem Source code MainActivity.java:
1 2 3 4 5 6 7 8 9 10 11 12 13 14 15 16 17 18 19 20 21 22 23 24 25 26 27 28 29 30 31 32 33 34 35 36 37 38 39 40 41 42 43 44 45 46 47 48 49 50 51 52 53 54 55 56 57 58 59 60 61 62 63 64 65 66 67 68 69 70 71 72 73 74 75 76 77 78 79 80 81 82 83 84 85 86 87 88 89 90 91 92 93 94 95 96 97 98 99 100 101 102 103 104 105 106 107 108 109 110 111 112 113 114 | package tranduythanh.com;
import android.os.Bundle;
import android.app.Activity;
import android.content.Intent;
import android.content.SharedPreferences;
import android.view.Menu;
import android.view.View;
import android.widget.Button;
import android.widget.CheckBox;
import android.widget.EditText;
public class MainActivity extends Activity {
Button btnlogin;
EditText edituser,editpassword;
CheckBox chksaveaccount;
String prefname="my_data";
protected void onCreate(Bundle savedInstanceState) {
super.onCreate(savedInstanceState);
setContentView(R.layout.activity_main);
btnlogin=(Button) findViewById(R.id.btnlogin);
edituser =(EditText)
findViewById(R.id.editUser);
editpassword=(EditText)
findViewById(R.id.editPassword);
chksaveaccount=(CheckBox)
findViewById(R.id.chksaveacount);
btnlogin.setOnClickListener(
new View.OnClickListener() {
public void onClick(View arg0) {
doLogin();
}
});
}
/**
* hàm đăng nhập hệ thống
*/
public void doLogin()
{
finish();
Intent i=new Intent(this, DangNhapThanhCongActivity.class);
i.putExtra("user", edituser.getText().toString());
startActivity(i);
}
@Override
protected void onPause() {
super.onPause();
savingPreferences();
}
@Override
protected void onResume() {
super.onResume();
restoringPreferences();
}
/**
* hàm lưu trạng thái
*/
public void savingPreferences()
{
SharedPreferences pre=getSharedPreferences
(prefname, MODE_PRIVATE);
SharedPreferences.Editor editor=pre.edit();
String user=edituser.getText().toString();
String pwd=editpassword.getText().toString();
boolean bchk=chksaveaccount.isChecked();
if(!bchk)
{
editor.clear();
}
else
{
editor.putString("user", user);
editor.putString("pwd", pwd);
editor.putBoolean("checked", bchk);
}
editor.commit();
}
/**
* hàm đọc trạng thái đã lưu trước đó
*/
public void restoringPreferences()
{
SharedPreferences pre=getSharedPreferences
(prefname,MODE_PRIVATE);
boolean bchk=pre.getBoolean("checked", false);
if(bchk)
{
String user=pre.getString("user", "");
String pwd=pre.getString("pwd", "");
edituser.setText(user);
editpassword.setText(pwd);
}
chksaveaccount.setChecked(bchk);
}
@Override
public boolean onCreateOptionsMenu(Menu menu) {
getMenuInflater().inflate(R.menu.activity_main, menu);
return true;
}
}
|
– Bạn xem source code DangNhapThanhCongActivity.java:
1 2 3 4 5 6 7 8 9 10 11 12 13 14 15 16 17 18 19 20 21 22 23 24 25 26 27 28 29 30 31 32 33 34 35 36 37 38 39 40 41 42 | package tranduythanh.com;
import android.os.Bundle;
import android.app.Activity;
import android.content.Intent;
import android.view.Menu;
import android.view.View;
import android.view.View.OnClickListener;
import android.widget.Button;
import android.widget.TextView;
public class DangNhapThanhCongActivity extends Activity {
TextView txtMsg;
Button btnThoat;
@Override
protected void onCreate(Bundle savedInstanceState) {
super.onCreate(savedInstanceState);
setContentView(R.layout.activity_dang_nhap_thanh_cong);
txtMsg=(TextView) findViewById(R.id.txtmsg);
btnThoat=(Button) findViewById(R.id.btnThoat);
btnThoat.setOnClickListener(new OnClickListener() {
@Override
public void onClick(View arg0) {
finish();
}
});
Intent i=getIntent();
txtMsg.setText("Hello : "+i.getStringExtra("user"));
}
@Override
public boolean onCreateOptionsMenu(Menu menu) {
getMenuInflater().inflate(R.menu.activity_dang_nhap_thanh_cong, menu);
return true;
}
}
|
– Như vậy là đã xong, bạn đã biết được cách lưu trạng thái. Chú ý là lưu trạng thái chỉ lưu Primitive Data, không cho phép lưu Object Serialize.
– Bạn click vào đây để tải coding mẫu: http://www.mediafire.com/download/4e4lyykdukgof82/LearnSharedPreferences.rar
————————————————————————————————————————–
-B- cách tạo Shared Preference Change Listeners để tạo giao diện cấu hình:
Bước 1:
– Tạo một Project Android bất kỳ, sau đó tạo thêm một layout PreferenceScreen:
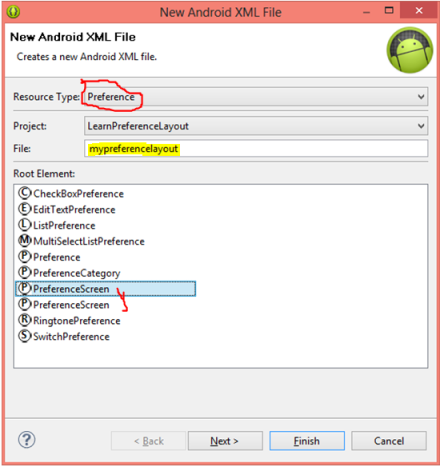
– đặt tên tùy ý (ở đây Tôi đặt tên mypreferencelayout)
– Không giống như layout bình thường, preference screen sẽ nằm trong thư mục xml như hình bên dưới:
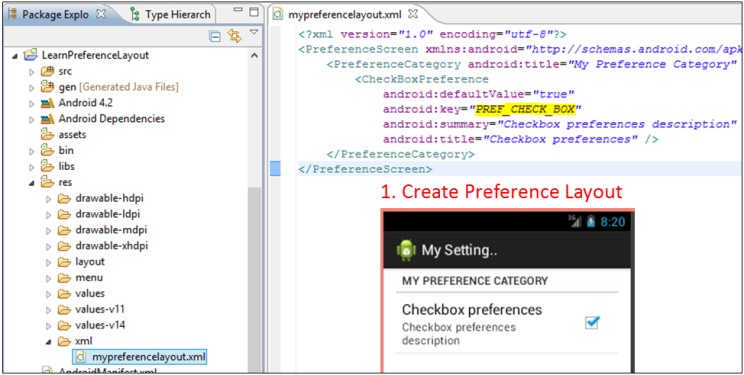
– Tiến hành tạo Checkbox giống như trên. (nó có nhiều control khác, tùy vào nhu cầu)
Bước 2:
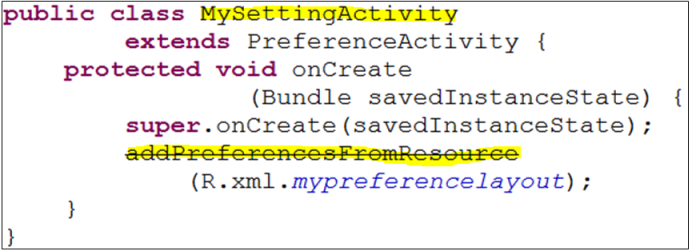
– Tạo Activity cho Prefence layout trên (Kế thừa từ PreferenceActivity):
Bước 3:
– Cấu hình Manifest XML cho Preference Activity ở trên:

Bước 4:
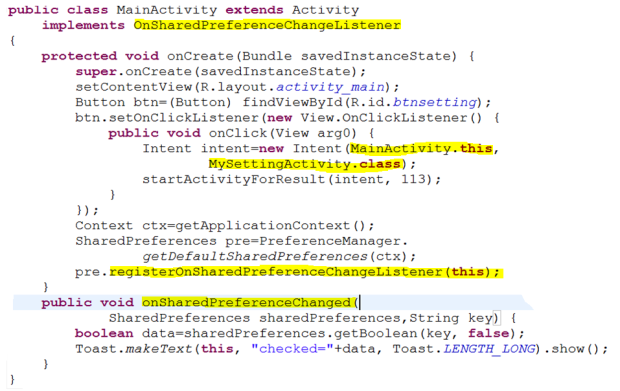
– Tiến hành sửa MainActivity để sử dụng Preference Activity (Đăng ký OnSharePreferenceChangeListener):
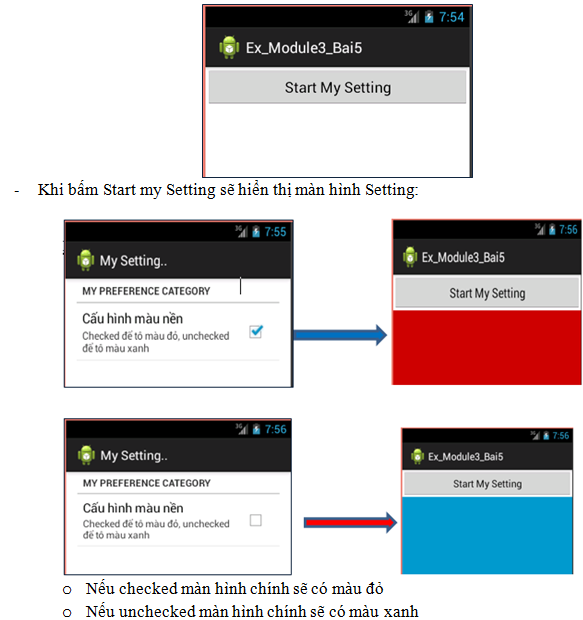
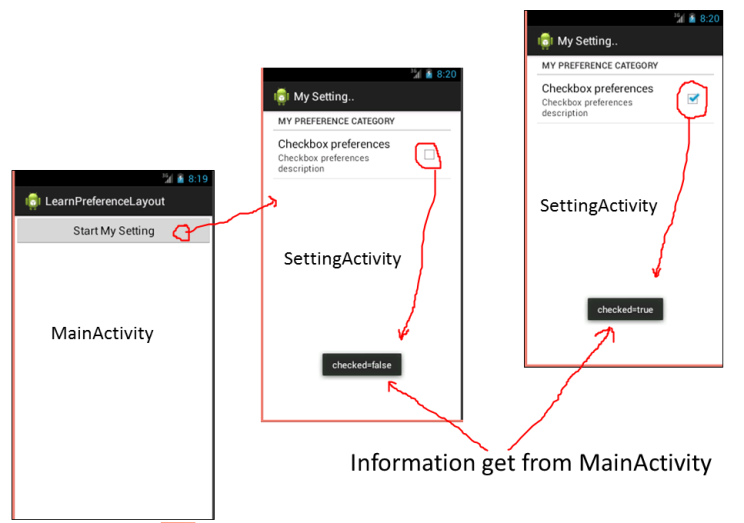
– Bạn có thể xem kết quả như bên dưới:
————————————————————————————————————————–
Ví dụ 2:
– Bạn cố gắng tự xem lại lý thuyết và đọc coding để hiểu. Ví dụ này Tôi không giải thích coding.
– Hay bạn cần tạo ra các màn hình để cấu hình (giống như màn hình Setting của thiết bị chẳng hạn – cần biết Shared Preference Change Listeners):